Raspberry Pi and IMPSY
Introduction
This workshop is a tutorial in running the IMPSY musical machine learning system on Raspberry Pi single board computers. The idea is to use this technology to create new intelligent musical instruments.
From a broader perspective, this workshop is a deep dive in how to get Python-based AI/ML software working well on a Raspberry Pi and how it can interact with typical music software such as Pure Data or hardware devices such as a MIDI USB synthesiser
Background
This workshop focuses on two technical areas: Python AI software development and Raspberry Pi programming. Both areas have lots of details and recommended practices might be different for different projects. The assumption here is that the software (IMPSY) is going to be deployed on a Rapsberry Pi that is more-or-less permanently integrated into a digital musical instrument. So, we will do things a bit differently that you might for a Raspberry Pi server, media player, etc.
An assumption about the workshop is that you might know a bit about Python (e.g., from coding classes or your own experiments) and a bit about using a Raspberry Pi (e.g., you might have tried operating one from a text command line).
This tutorial will work with: Raspberry Pi 3 Model B+, Raspberry Pi 4, Raspberry Pi 5, Raspberry Pi Zero 2 W. These are the models that specifically support the 64-bit Raspberry Pi OS which is required. I have been using RPi Zero 2 W because they are the smallest and cheapest and thus best1 for creating many musical instruments. The RPi 5 is much faster and better in almost every way as long as you are ok with spending more money and having a physically larger board. If you are bringing your own Pi, make it a 4 or 5! Life will be good.
Requirements
- Laptop with MacOS, Linux, or Windows which has: Docker and Python 3.11+
- Optional: Raspberry Pi 4, 5, Zero 2 W (I will bring Raspberry Pi Zero 2 W’s for testing if you want to borrow one).
- A sense of adventure.
N.B.: if you are bringing a Raspberry Pi, please bring a microSD card (16GB or greater) that you are comfortable erasing.
Checkpoints
By the end of the workshop, you should have tried out doing some of the following things
- Run IMPSY on your computer using Docker (or installing with Poetry)
- Collect data, train models, and run IMPSY on your computer
- Run IMPSY on a Raspberry Pi
- Transfer a trained model to a Raspberry Pi and perform with it
- Retrieve more data from the Raspberry Pi
Workshop Tasks
Learning about what IMPSy is, and how it works.
IMPSY is a generative AI system designed to integrate into typical NIMEs. IMPSY’s job is to receive inputs from a NIME’s interface (e.g., knobs, sensors, controllers, etc) and send outputs to a NIME’s sound/music generators (e.g., a MIDI synthesiser, Pd patch, Processing sketch).
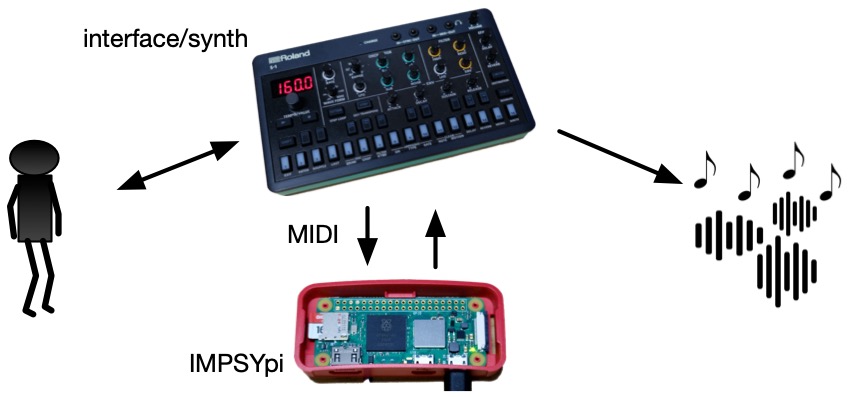
The machine learning model in IMPSY is trained to produce the next action in a sequence of control signals. A unique aspect of IMPSY’s model is that it can work with a number of control signals simultaneously and that it also predicts the time that the next action will occur. This means that it is particularly useful in NIMEs where we might have a number of sensors (e.g., 8 knobs, 12 light sensors) working together, and where we might be performing music with free or irregular rhythm.
IMPSY is usually configured to take over control of a NIME when the musician is not playing, but allowing signals from the musician to go straight through to the sound generator. It’s also possible to use it as a filter between the musician’s actions and and the parameters sent to a sound generator. Other configurations might be possible and exploring these is one reason to work with this system!
The machine learning model in IMPSY is a recurrent neural network using long short-term memory (LSTM) cells and a mixture density distribution for determining outputs. This is, now, a fairly well-explored design and one that has been previously shown to work well in NIME designs on devices as inexpensive as a Raspberry Pi.
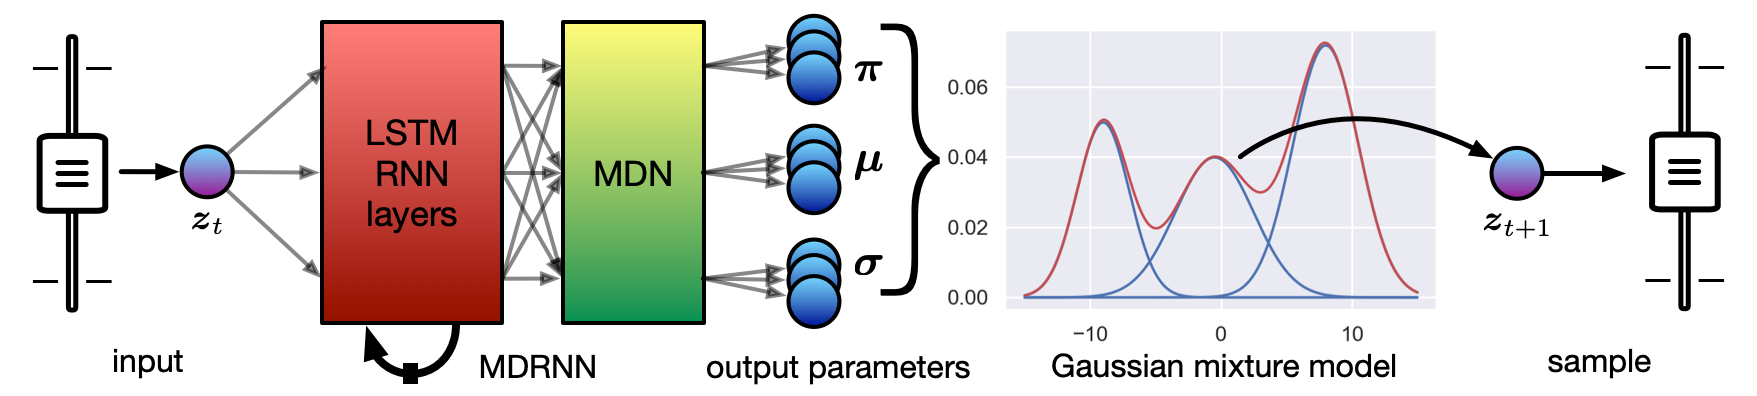
An LSTM-RNN is a typical design for AI systems that learn to generate sequences. Using a mixture density network (MDN) at the end (as IMPSY does) allows us to generate multi-dimensional and continuous valued data and gives us some high-level controls over how “random” the generated choices will be. As Leitman (2017) tells us, continuous sensors make for more effective NIMEs and so this mixture density recurrent neural network (MDRNN) is a good choice for NIME interaction.
Learning all the details of how to create MDRNNs is a bit beyond this workshop, but here are some slide decks (presented at a previous NIME workshop about these systems):
- Deep Dive on RNNs
- Presentation on Mixture Density Networks
- Making Predictive NIMEs with Neural Networks
- An Interactive Musical Prediction System with MDRNNs
While LSTM-RNNs are a bit out of fashion compared with the transformer approaches used in present large language models (LLMs), the purpose of this workshop is efficient neural network designs that work in an embedded setting (no data centres and no GPUs required), MDRNNs are still a very good choice in this context.
The IMPSY workflow
Although IMPSY includes some sample generative AI model files, ideally you would train your own models on your own data. IMPSY helps you do this in three steps:
- collect data: run IMPSY with your musical interface with or without a machine learning model working. IMPSY saves your interaction data as
.logfiles. - collate log files into a dataset: collect one or more log files together in a
.npzfile in a format that is convenient for AI training. You can use thedatasetcommand in IMPSY’s CLI or use the web UI. - train an AI model: run a training procedure on a dataset file to create a new generative AI model. You can only train models with the CLI.
In the workshop we will do this with IMPSY running on a Raspberry Pi Zero 2 W and using either a microbit or Pd running on your laptop as the interface and synth.
Running IMPSY on a Raspberry Pi
This section is about running IMPSY on a physical Raspberry Pi, we can do some experiments to demonstrate how it might work in practice.
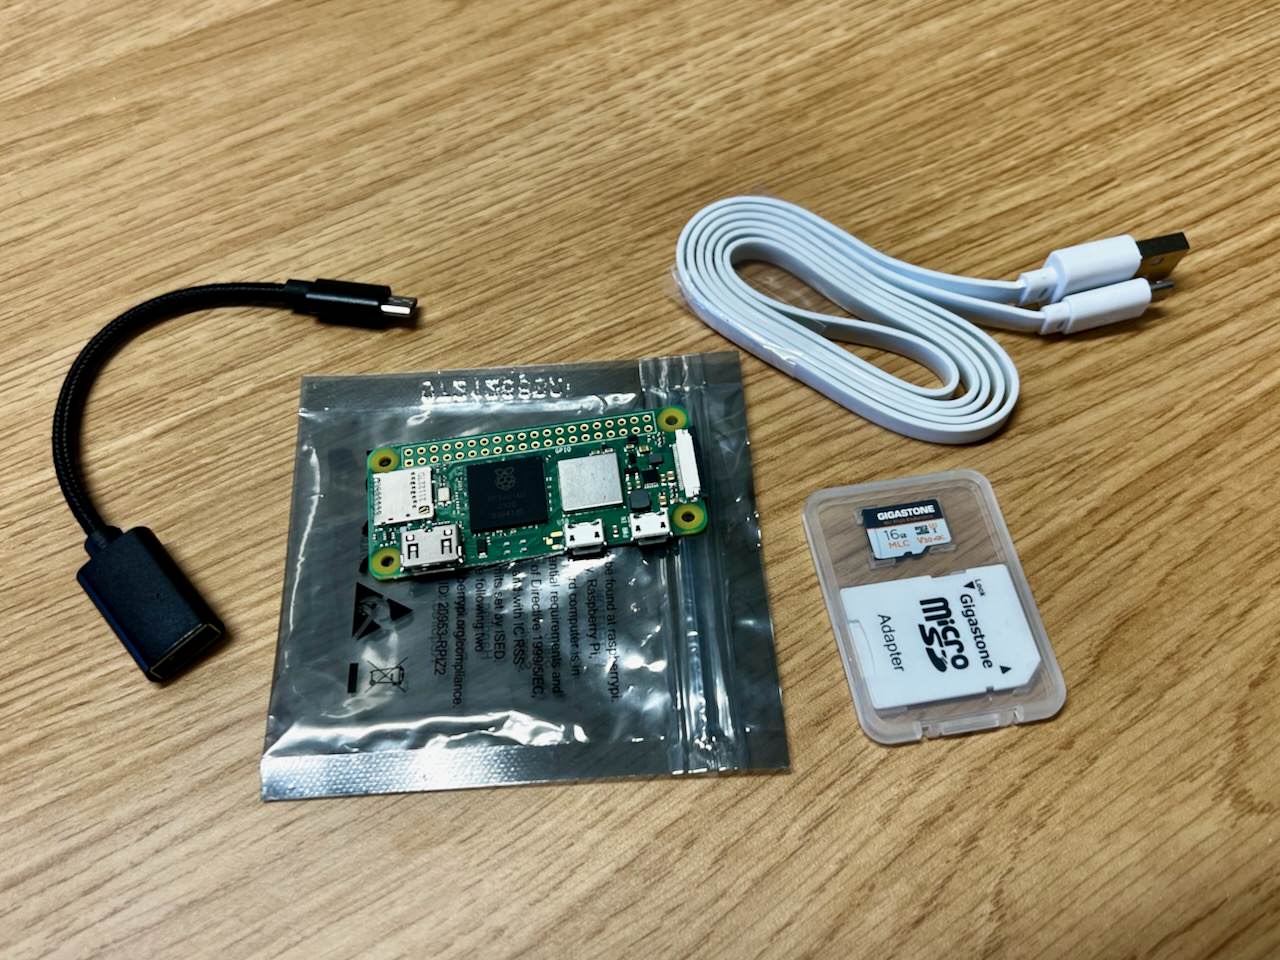
At the workshop we will have physical Raspberry Pi kits available to try out. These include:
- a Raspberry Pi Zero 2 W
- a 16GB SD card
- a USB type-A to USB micro type-B cable
- a USB host adapter.
At the workshop we will have 10 kits available so you might have to work together with another participant. If you have brought your own Pi, we will some extra blank SD cards that you can borrow for the day.
Download the OS image and flash to an SD card
IMPSY has a preinstalled SD card image that you can flash to an SD card so that yuo are ready to go2, for this part of the tutorial, take a look at the impsy-rpi-image-maker repository.
-
Go to the releases page and download the
.img.xzfile for the latest release. It should be about 1.2GB. -
Grab your 16GB+ SD card.
-
Open the Raspberry Pi OS Imager and use it to open the
.img.xzfile and flash to your SD card. You’ll need to select “custom image” under Operating System and your SD card from the storage menu. When it helpfully offers to customise the settings, click “no”.
Not too hard! The SD card has a default login with username “pi” and password “raspberry”. This is obviously a terrible security practice, but it’s not really designed to be connected to the internet so hopefully acceptable for our purposes. The hostname is set to beimpsypi.local.
The SD card image has IMPSY already installed (in ~/impsy). It is also configured to start IMPSY’s interaction server at boot3 as well as IMPSY’s web user interface.
Finally, the SD card is configured to allow ethernet over USB so you can plug your Raspberry Pi into your laptop with a USB cable and access IMPSY features from a web browser (wow just like a bela!)
Connect the IMPSYpi to your computer
-
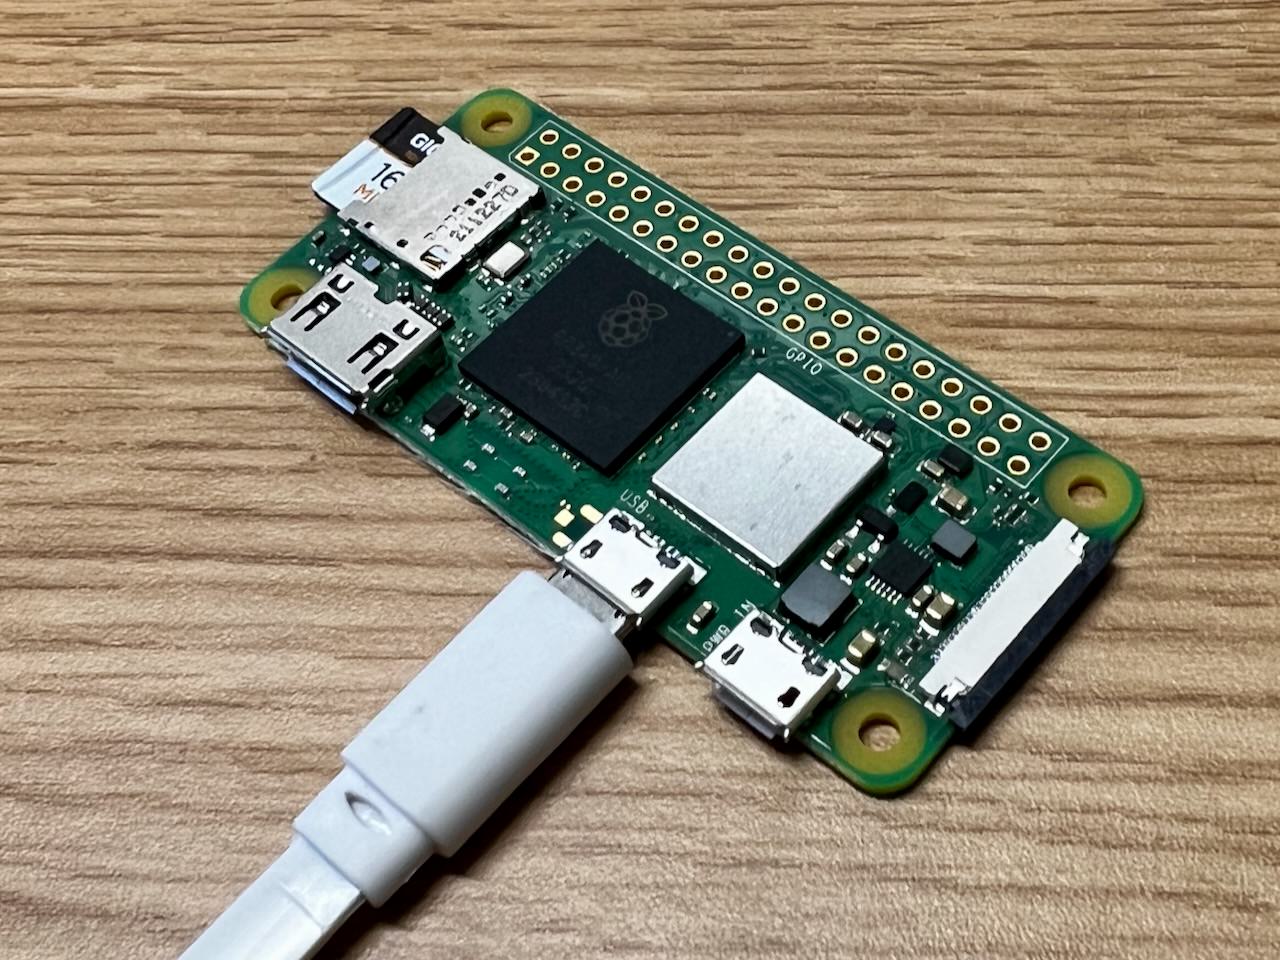
Stick your SD card into the Raspberry Pi.
-
Connect the USB cable’s “device” end to the Raspberry Pi. If it’s a RPi Zero 2 W, use the USB host port (marked USB in tiny writing), not the “power” port (marked PWR IN). If it’s a 3B+, 4, or 5, use the USB power port.
-
Hopefully some lights blink and your Pi seems to be booting…
Connecting to the Raspberry Pi should be straightforward: if your computer knows about it over USB-ethernet, you can just type http://impsypi.local:4000 into a web browser and see the web UI. The pi gives itself the IP address 169.254.1.107 so you might try http://169.254.1.107:4000 as well if the above doesn’t work.
Now you can poke around the web UI and see what you can do. Most importantly, you can update the configuration file directly, download log files and generate or download datasets. You can’t train new models from the web UI (yet!) and it’s possibly a bad idea to train models on the slower Raspberry Pis anyway.
N.B.: I’m new to this whole ethernet over USB and SD card building business. I’m probably doing something wrong so if there are issues here please be patient and if you know a better way to set something up, let me know!
Once you’ve verified that the web UI works, it’s a good idea to try to connect to your pi via SSH. Open a terminal (if you’re on macOS or Linux) or open Putty or another SSH app if you’re on Windows and connect to the pi with:
ssh pi@impsypi.local
(remember that the password is raspberry)
While you’re here you might like to check on the IMPSY “run” service:
sudo systemctl status impsy-run.service
It should spit out some output from the “run” service. If you need to restart the run service (e.g., to load a new config) you can run:
sudo systemctl restart impsy-run.service
Congratulations! You’ve got an IMPSY pi! Time to do something with it.
Configuring your IMPSYpi
With your IMPSYpi connected to your computer, point your browser at http://impsypi.local:4000.
why are we looking in a browser now? IMPSY has a web interface that lets you see/download/edit: log files that have been collected, datasets that have been collected, available model files, and the main configuration file for IMPSY
config.toml.
Click the configuration link on the IMPSY web interface and you can see the config.toml file that is loaded for IMPSY automatically on boot.
IMPSYpi with a microbit interface
I brought some BBC micro:bit v2 boards which provide some very convenient input and output channels. I’ve have a program flashed on them which:
- sends out serial messages in the form
accel_x,accel_y,accel_z\nwhen you move them - receives serial messages in the form
x,y,z\n - sonifies either the output or input serial messages (badly!)
- displays the input message state on the LED array.
We can use these and the IMPSYpis to make tiny intelligent NIMEs with IMPSY!
To use it, connect an IMPSYpi to your computer, navigate to http://impsypi.local:4000, and update the configuration so that:
The model block looks like:
[model]
dimension = 4
file = "models/musicMDRNN-dim4-layers2-units64-mixtures5-scale10.tflite"
size = "s" # Can be one of: xs, s, m, l, xl
sigmatemp = 0.01
pitemp = 1
timescale = 1
And there is a serial block:
[serial]
port = "/dev/ttyACM0" # likely serial port on Raspberry Pi (also the default GPIO serial port name if enabled).
baudrate = 115200 # a typical default choice of baudrate
(You can remove any other IO block (midi, osc, websockets, serialmidi).)
Next step is to connect the microbit to the IMPSYpi, power it all up and hopefully after a minute or so you’re hearing some really weird sound.
There’s a wrinkle in the microbit/IMPSYpi plan: if you’re doing this on a Raspberry Pi Zero 2 W we don’t have a way to simultaneously have the Raspberry Pi connected to the computer and the microbit as there’s only one USB port. This means we have to just trust that the microbit will show up on
/dev/ttyACM0and I have trust issues with my Raspberry’s Pi.
The sound the microbit makes is fairly awful. I needed a quick workshop example and got something to work that would use three “values” from IMPSY to make a sound. Three is a nice number here because the microbit has a three-axis accelerometer. The code is in
exampels/microbit_serial_example.pyand you can flash your microbit with it using the Microbit’s micropython editor. The “sound” bit usesaudio.SoundEffect()to synthesise some audio andaudio.play()to send it to the speaker. There’s quite a lot you can do with audio on the microbit (it’s an underutilised NIME-capable platform!), including cool stuff like bytebeat.
the microbit’s serial connectivity can be a bit wonky. You need to plug them in AFTER your Raspberry Pi has started booting or the serial connection doesn’t work. If they seem to misbehave, just unplug/replug.
Pure Data with IMPSYpi
We can test the IMPSYpi by interacting with Pure Data running on your laptop. When you connect over USB, your computer is given the IP address “192.254.1.1” (or something else, so check) so we just need to configure IMPSY to send messages to that IP.
Connect an IMPSYpi to your computer, navigate to http://impsypi.local:4000, and update the configuration so that:
# Model configuration
[model]
dimension = 4
file = "models/musicMDRNN-dim4-layers2-units64-mixtures5-scale10.tflite"
size = "s" # Can be one of: xs, s, m, l, xl
sigmatemp = 0.01
pitemp = 1
timescale = 1

[osc]
server_ip = "0.0.0.0" # Address of IMPSY
server_port = 6000 # Port IMPSY listens on
client_ip = "169.254.1.1" # Address of the output device (figure this out from your network settings, it may vary.)
client_port = 6001 # Port of the output device
(You can remove any other IO block (midi, osc, websockets, serialmidi).)
Restart the IMPSYpi, reconnect it and on your computer and open the workshop pd example.
The pd example should start receiving messages from the IMPSYpi, but to send messages back you need to change the example a bit:
- make sure you’re not in edit mode (edit menu, command-e or control-e).
- click on the
pd send-oscsub-patch to open it. - change to edit mode.
- edit the message box that starts with “connect” so that it reads
connect impsypi.local 6000 - Now when you touch the input sliders it sends messages back to the IMPSYpi.
Another option here would be to run Pure Data directly on your Raspberry Pi. You would just have to install Pd onto your IMPSYpi (so you would need to have wifi or another internet connection set up).
Getting log/model data to/from your IMPSYpi
This section is about geting logs, datasets and models to and from your IMPSYpi.
Retrieving more data from the Raspberry Pi
You can download data from the Raspberry Pi as individual .log files or .npz datasets.
- Head to http://impsypi.local:4000.
- Click on either the logs or datasets links.
- If you’re on the datasets page, you can generate new datasets from all your saved logs and then download them.
- If you’re on the logs page you can download logs individually.
Transferring a trained model to the Raspberry Pi
You can transfer trained models to the Raspberry Pi through the web interface.
- Head to http://impsypi.local:4000
- click on the “Model Files” link
- click “Choose File” and select your
.tflitetrained model file. - click upload.
- go back to the “edit configuration” page and make sure your model file is listed in the
[model]block, it should look something like:
[model]
dimension = 9
file = "models/your_model_file_name_here.tflite"
size = "s" # Can be one of: xs, s, m, l, xl
But how do you train a model to have one to send to the raspberry pi? That’s why we have the next section.
Installing IMPSY with Docker
IMPSY is distributed as a code repository at https://github.com/cpmpercussion/impsy. We’re going to try installing it as a docker container.
The downside of the docker container is that it won’t know about MIDI devices on your system (OSC communication is fine). You can also install IMPSY directly using Poetry and Python but it can be tricky. So start with Docker and go for native Python later if you have time.
So here’s your first tasks:
-
download IMPSY, either cloning the repo above or, at the website, click “Code” (big green button) and download zip.
-
Docker Install: ensure that you have docker on your computer, if you don’t, head to https://www.docker.com to get an installer and install it.
-
using a command line, navigate to the directory where IMPSY’s code is (e.g., for me on macos it’s
/Users/charles/src/impsy) -
Install: run
docker pull charlepm/impsy– this will download a docker image which hasimpsy(and it’s dependencies) preinstalled
Testing the Docker image
So now we are going to try running IMPSY on your laptop in a Docker container (actually in two docker containers, fancy!) Here’s steps to test IMPSY with Docker:
-
Run the container: you can try out the docker container by running:
docker run -it --rm charlepm/impsy, this should leave you in a bash prompt with something likeroot@07a13e52f703:/impsy# -
Try some impsy commands: you can see the commands in IMPSY by typing
poetry run ./start_impsy.py --helpinto the bash prompt of your docker container. -
You might like to try the command
poetry run ./start_impsy.py test-mdrnnwhich sets up IMPSY’s MDRNN to check everything is working. -
Try the command
poetry run ./start_impsy.py runto run IMPSY’s interaction server. This should start generating data using the default configuration: a pre-trained 8-channel MDRNN, you’ll see the outputs shown on the screen in MIDI format (numbers between 0 and 127). -
You can type
Ctrl-C(control key and then c held together) to exit IMPSY and typeexitto exit the Docker container.
Training an IMPSY model with the docker image.
You can use your docker IMPSY image to train new models. The trick is to make sure that your model files are visible to the inside of the docker container. If you put your dataset files in the datasets folder of the impsy directory on your computer, you could then run something like:
docker run --rm \
  --volume ./datasets:/impsy/datasets \
  --volume ./models:/impsy/models \
  charlepm/impsy \
  poetry run ./start_impsy.py train -D 4 -S datasets/training-dataset-4d.npz
to train a 4D model. This command makes sure that the model files that are saved by the train command get saved out of the docker container and in your regular computer filesystem.
You should find after that command files something like the following in your models directory:
musicMDRNN-dim4-layers2-units64-mixtures5-scale10.tflite
musicMDRNN-dim4-layers2-units64-mixtures5-scale10.keras
Both work as IMPSY models but the tflite file is optimised to run on constrained hardware like the Raspberry Pi Zero 2 W.
Testing IMPSY configurations on a computer with Docker
What if you want to just cut out the Raspberry Pi and just run IMSPY on a computer? Here’s how to do it.
Running two IMPSYs with Docker Compose
IMPSY has a web-based interface which is convenient, particularly when we run it on a Raspberry Pi. You actually need to run IMPSY twice to get this working: one instance of IMPSY is the interaction/AI part, and another is the web user interface. You’ll be able to conveniently check on the log files IMPSY has and edit it’s configuration while it is running.
We can coordinate this in Docker using the docker compose command that runs multiple containers and organises network connections between them. You can look in the impsy/docker-compose.yml to see how it is set up. Here’s the steps to run two IMPSYs with Docker compose:
-
Look in
docker-compose.yml: this file sets up twocharlepm/impsycontainers, and maps the important folders from theimpsydirectory (on your computer) to their location in the containers. The folders aredatasets,logs,models, and one fileconfig.toml. The -
run the command
docker compose -f docker-compose.yml upto bring everything online (yes its that easy, if you haven’t tried docker compose before it feels a bit magical) -
you can see that it’s working by going to
http://127.0.0.1:4000in a browser
why are we looking in a browser now? IMPSY has a web interface that lets you see/download/edit: log files that have been collected, datasets that have been collected, available model files, and the main configuration file for IMPSY
config.toml.
editing config.toml: Now that IMPSY is up and running let’s edit config.toml and define an interaction with a basic Pure Data patch. Remember that IMPSY in a Docker container can’t use MIDI, but we can interact using OSC with Pure Data. Click on “Edit Configuration” in the web UI and look at the [model] and [osc] blocks.
Change the [model] block to look like:
[model]
dimension = 4
file = "models/musicMDRNN-dim4-layers2-units64-mixtures5-scale10.tflite"
size = "s" # Can be one of: xs, s, m, l, xl
sigmatemp = 0.01
pitemp = 1
timescale = 1
Change the [osc] block to look like:
[osc]
server_ip = "0.0.0.0" # IMPSY should listen on all addresses
server_port = 6000 # port IMPSY listens on
client_ip = "host.docker.internal" # this is docker's name for the host device
client_port = 6001 # port that pd is listening on
Click “Save Configuration” at the bottom. Restart the impsy docker containers and you should see different output from IMPSY with only three values, e.g. out: [72, 115, 61].
Open up examples/workshop_example.pd and you should see the levers start moving in the Pure Data patch! If so, it’s working!
Collecting some data and training a model
Once you have Pd and IMPSY working in the previous example, you can now control your model with the sliders at the top of the patch and see the output from the model at the bottom.
Log data: IMPSY calls the data you collect “log” and they are text files with a
.logextension. When you move the top sliders, IMPSY is logging the data so you are adding to the dataset! You can see your logged data in thelogsfolder or on the “Log Files” page of IMPSY’s web interface.
Set up IMPSY natively with Python
There are good reasons to install IMPSY natively on your computer, that is, to run it without Docker. The complication is that IMPSY is specific about the Python version and packages you need and this can take longer to set up than one workshop. Here are the instructions if you want to try this yourself.
For this you will need to install:
- python 3.11
poetry
IMPSY really needs Python 3.11.x to work (not 3.8, not 3.12… etc), so you might need to think about having multiple pythons available. The exact instructions here vary by system but we can confirm that valid install paths are available on MacOS, Windows, and Linux4. There are lots of ways to install Python and Poetry so here are the rough instructions that may need some research to help proceed:
-
run
python --versionat a command line to see what version of Python you have. -
if you need to install Python 3.11 you can theoretically get Python from here, but you might have better luck installing
pyenvto manage different python versions, you can see it here. -
Once you have
pyenv, you can runpyenv install 3.11andpyenv global 3.11to make sure that thepythoncommand maps to Python 3.11. -
Poetry: Poetry is a dependency manager for Python packages, see https://python-poetry.org. To install Poetry, run this command:
curl -sSL https://install.python-poetry.org | python3 - -
You can test your poetry install by running
poetryon a command line. -
Install IMPSY: now you can run
poetry installto install IMPSY’s dependencies (hope this works!). -
Test out IMPSY: you should be able to test out IMPSY by running the same commands as inside the docker container: e.g.,
poetry run ./start_impsy.py test-mdrnn.
Here’s some platform specific advice which is broadly how I would install things:
Linux advice: The above instructions tend to work most easily on Linux and
pyenvworks well there. You will need to follow the “set up your shell environment for Pyenv” following the “For bash” instructions if your default shell is bash. Install poetry with the official installer.
MacOS advice: You can install
pyenvwith Homebrew:brew install pyenv. You will need to follow the “set up your shell environment for Pyenv” following the “For Zsh” install instructions. Install poetry with the official installer.
Windows advice: Using native Windows (not WSL), install pyenv-win with PowerShell (make sure no other Pythons are installed). I install
pipxon Windows with scoop and then runpipx install poetryto install Poetry.
-
arguably the best I suppose 🙃 ↩
-
I’m weirdly proud of this SD card image! Figuring out a good way to make a custom Raspberry Pi image was a bit challenging and quite fun. The details are documented in the repo so check it out. ↩
-
using two systemd services:
impsy-run.serviceandimpsy-web.service. ↩ -
It’s true! We test IMPSY on Windows, MacOS and Linux! That might not help you feel good if your install isn’t working. ↩